Wednesday, November 19, 2008

Yellow Rice and Chicken - 2 Versions
I have a recipe for Yellow Rice and Chicken, the recipe came from my dear mother, Cathy Black. The recipe came to Mom from a lady at Orange First Assembly, Wilma Robinette. The chicken and rice in this dish are so flavorful but it takes a very long time to prepare and involves frying the chicken in Olive Oil for 45 minutes before baking the dish in the oven. For these reasons I don't make it very often, but when I do, it is heavenly!
So last night in the middle of making dinner I had a craving for Yellow Rice and Chicken so I tried to get those flavors into a quicker, healthier recipe. When I got ready to add the rice I was low on regular white rice so I had to use Basmati which remains more firm and seperate - the flavor was great but I prefer the texture of regular white rice. I will include Mom's (& Wilma's) recipe at the bottom of this post in case you want to try the original.
I highly recommend the use of an electronic probe thermometer for roasting meat, you place the thermometer in the meat and put it in the oven. The probe is attached by a long wire to an electronic control which stays outside the oven. You program the control for the target temperature and when the meat reaches that temperature - the control beeps letting you know that the food is ready. No taking things in and out of the oven to check them - no more guessing if the meat is done enough... Roasting couldn't be any easier once you have a thermometer like this - I can't imagine making a holiday dinner without one!

Yellow Rice and Chicken - Modern Version
Chicken
Chicken Pieces Bone-In and Skin On
Lawry's Seasoned Salt
Preheat Oven to 350 degrees F.
Wash and dry chicken pieces (I used skin-on bone-in Chicken Thighs) and season them with Lawry's Seasoned Salt (the red stuff.) Place in a shallow baking dish and bake in the oven until a thermometer placed into the thickest part of the meat (not touching the bone) reads 170 degrees F or the meat is cooked through.
Rice
1 Cup Rice
2 Tbs. Olive Oil
1/2 onion, chopped
1/2 bell pepper, chopped (red or green)
1 bay leaf
2 garlic cloves, minced
2 cup chicken broth or 1 Knorr Chicken Bouillon Cube & 2 cups water
4 Tbs Diced Tomato Canned or Fresh
1/2 teaspoon salt
Heat olive oil in a large saucepan. Add onion and bell pepper, cook until onion is translucent.
Add bay leaf, and rice (& bouillon cube if using.) Move rice around in the pan so it becomes coated in the oil, keep the rice moving in the pan until it is lightly toasted. Clear a small area at the bottom of the pan and add the minced garlic, cook until fragrant about 30 seconds. Add tomatoes and chicken broth or water, add salt. Bring up to the boil, put the lid on the rice and reduce heat to low.
Cook without removing the lid for 20 minutes (or according to rice package directions.) After cooking time has passed turn off the heat (still not removing the lid) and let set for an additional 5 minutes off heat. Remove lid, discard bay leaf, fluff rice and serve.
Yellow Rice and Chicken - Classic
(Cathy Black - Wilma Robinette)
1 cut up frying chicken
1 onion, diced
garlic
1 1/2 quart chicken broth or water
1 Tbs salt
1 bay leaf
1/2 tsp saffron (optional - I like better without)
2 cups raw white rice
3/4 cup Olive Oil
1 green bell pepper
3/4 cup fresh tomatoes, chopped
Fry chicken slowly in olive oil, about 45 min. Near end of time add bell pepper and onion. When tender add garlic cook for a moment then add tomatoes, part of broth and salt. Boil 5 minutes. Put all together in baking dish, stir. Cook in 400 degree F oven until rice is dry and tender, about 45 minutes.
So last night in the middle of making dinner I had a craving for Yellow Rice and Chicken so I tried to get those flavors into a quicker, healthier recipe. When I got ready to add the rice I was low on regular white rice so I had to use Basmati which remains more firm and seperate - the flavor was great but I prefer the texture of regular white rice. I will include Mom's (& Wilma's) recipe at the bottom of this post in case you want to try the original.
I highly recommend the use of an electronic probe thermometer for roasting meat, you place the thermometer in the meat and put it in the oven. The probe is attached by a long wire to an electronic control which stays outside the oven. You program the control for the target temperature and when the meat reaches that temperature - the control beeps letting you know that the food is ready. No taking things in and out of the oven to check them - no more guessing if the meat is done enough... Roasting couldn't be any easier once you have a thermometer like this - I can't imagine making a holiday dinner without one!

Yellow Rice and Chicken - Modern Version
Chicken
Chicken Pieces Bone-In and Skin On
Lawry's Seasoned Salt
Preheat Oven to 350 degrees F.
Wash and dry chicken pieces (I used skin-on bone-in Chicken Thighs) and season them with Lawry's Seasoned Salt (the red stuff.) Place in a shallow baking dish and bake in the oven until a thermometer placed into the thickest part of the meat (not touching the bone) reads 170 degrees F or the meat is cooked through.
Rice
1 Cup Rice
2 Tbs. Olive Oil
1/2 onion, chopped
1/2 bell pepper, chopped (red or green)
1 bay leaf
2 garlic cloves, minced
2 cup chicken broth or 1 Knorr Chicken Bouillon Cube & 2 cups water
4 Tbs Diced Tomato Canned or Fresh
1/2 teaspoon salt
Heat olive oil in a large saucepan. Add onion and bell pepper, cook until onion is translucent.
Add bay leaf, and rice (& bouillon cube if using.) Move rice around in the pan so it becomes coated in the oil, keep the rice moving in the pan until it is lightly toasted. Clear a small area at the bottom of the pan and add the minced garlic, cook until fragrant about 30 seconds. Add tomatoes and chicken broth or water, add salt. Bring up to the boil, put the lid on the rice and reduce heat to low.
Cook without removing the lid for 20 minutes (or according to rice package directions.) After cooking time has passed turn off the heat (still not removing the lid) and let set for an additional 5 minutes off heat. Remove lid, discard bay leaf, fluff rice and serve.
Yellow Rice and Chicken - Classic
(Cathy Black - Wilma Robinette)
1 cut up frying chicken
1 onion, diced
garlic
1 1/2 quart chicken broth or water
1 Tbs salt
1 bay leaf
1/2 tsp saffron (optional - I like better without)
2 cups raw white rice
3/4 cup Olive Oil
1 green bell pepper
3/4 cup fresh tomatoes, chopped
Fry chicken slowly in olive oil, about 45 min. Near end of time add bell pepper and onion. When tender add garlic cook for a moment then add tomatoes, part of broth and salt. Boil 5 minutes. Put all together in baking dish, stir. Cook in 400 degree F oven until rice is dry and tender, about 45 minutes.
Frightening Fun - Quick Color Technique
As part of this weeks Classics Artwork Blitz, here are more Classic samples using the Quick Color Technique described in Monday's Post The Fragrant Hand: Quick Color Technique - Line Image and Tuesday's Post The Fragrant Hand: Quick Color Technique - Solid Image.

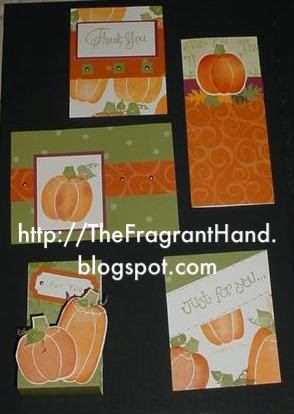
I added additional shading to the pumpkins with the quick color sponging technique by cutting out the segments of the pumpkins.
These samples are made with Frightening Fun (retired) but would work wonderfully for adding dimension to the new CTMH stamp set Spooky Smiles just cut segments into your stencil and sponge in a deeper shade or gold or orange.
Check back tomorrow (10 AM Central Time) for a quick tip for use with any solid pumpkin stamp set.
If you try this, please post a comment to this post and share the link to your artwork. I'd love to see what you make using this technique!
All supplies by Close To My Heart
Stamps: Frightening Fun, Curly Greetings
Color Used: Sunflower, Autumn Terracotta, Olive
Ticket Template (retired)
I added additional shading to the pumpkins with the quick color sponging technique by cutting out the segments of the pumpkins.
These samples are made with Frightening Fun (retired) but would work wonderfully for adding dimension to the new CTMH stamp set Spooky Smiles just cut segments into your stencil and sponge in a deeper shade or gold or orange.
Check back tomorrow (10 AM Central Time) for a quick tip for use with any solid pumpkin stamp set.
If you try this, please post a comment to this post and share the link to your artwork. I'd love to see what you make using this technique!
All supplies by Close To My Heart
Stamps: Frightening Fun, Curly Greetings
Color Used: Sunflower, Autumn Terracotta, Olive
Ticket Template (retired)
Tuesday, November 18, 2008
Quick Color Technique - Solid Image
Welcome to day two of this weeks Classic Artwork Blitz!
Yesterday I showed you how to use the quick color technique with a line image. The Fragrant Hand: Quick Color Technique - Line Image Today I will show you how to use it to shade and color solid images. You can color an entire image or you can add colors to an image stamped in a single shade.
First I made my stencil.
I knew that I wanted to apply 3 colors so I made 3 stencils by stamping 3 boats spaced well apart on Glossy Card stock in Archival Black Ink. I like to use glossy card stock because it holds up better for multiple uses and archival black ink because once it is dry it won't smear onto the colored image. I cut away the area for a single color from each boat, using an exacto knife.

Cutting out the stencil takes time, but I only have to do it once as I store the stencil with the stamp set and use it again and again.
Coloring the Image
I stamped my boat image in desert sand ink because I wanted to add color over the desert sand. If you want to use this technique with the entire image - stamp with a light color like buttercup that will be easy to cover, but dark enough to see to position the stencil.
I placed my stencil over the image lining up the part I wanted to color - you can tape the stencil into place using removable tape if you like.
Continue to move the stencil and sponge on the ink until all the sections are colored
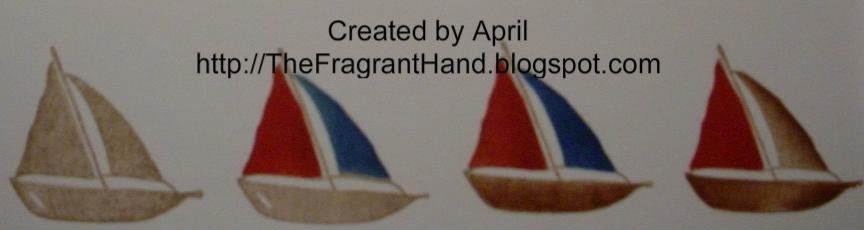
Here I have shown you the progression of images from left to right...
1) Solid stamped image in Desert Sand
2) added red and blue to sails
3) added brown to hull.

4) The final boat is colored in red and brown only, this image shows darker shading on the front edge of the brown sail and at the bow and stern. This look is achieved by rubbing the ink strongly into the edge of the stencil where you want the color to be more concentrated.
Check back tomorrow (10 AM Central Time) to see more samples using this technique.
If you try this, please post a comment to this post and share the link to your artwork. I'd love to see what you make using this technique!
All supplies by Close To My Heart
Stamp Set: Light the Way (retired)
Yesterday I showed you how to use the quick color technique with a line image. The Fragrant Hand: Quick Color Technique - Line Image Today I will show you how to use it to shade and color solid images. You can color an entire image or you can add colors to an image stamped in a single shade.
First I made my stencil.
I knew that I wanted to apply 3 colors so I made 3 stencils by stamping 3 boats spaced well apart on Glossy Card stock in Archival Black Ink. I like to use glossy card stock because it holds up better for multiple uses and archival black ink because once it is dry it won't smear onto the colored image. I cut away the area for a single color from each boat, using an exacto knife.
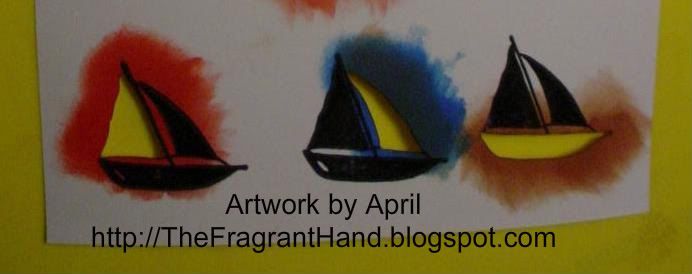
Cutting out the stencil takes time, but I only have to do it once as I store the stencil with the stamp set and use it again and again.
Coloring the Image
I stamped my boat image in desert sand ink because I wanted to add color over the desert sand. If you want to use this technique with the entire image - stamp with a light color like buttercup that will be easy to cover, but dark enough to see to position the stencil.
I placed my stencil over the image lining up the part I wanted to color - you can tape the stencil into place using removable tape if you like.
Continue to move the stencil and sponge on the ink until all the sections are colored
Here I have shown you the progression of images from left to right...
1) Solid stamped image in Desert Sand
2) added red and blue to sails
3) added brown to hull.
4) The final boat is colored in red and brown only, this image shows darker shading on the front edge of the brown sail and at the bow and stern. This look is achieved by rubbing the ink strongly into the edge of the stencil where you want the color to be more concentrated.
Check back tomorrow (10 AM Central Time) to see more samples using this technique.
If you try this, please post a comment to this post and share the link to your artwork. I'd love to see what you make using this technique!
All supplies by Close To My Heart
Stamp Set: Light the Way (retired)
Monday, November 17, 2008
Quick Color Technique - Line Image
Welcome to day one of this weeks Classic Artwork Blitz!
I promised to share some oldies but goodies so here is the first classic technique. These stamps are long since retired but the techniques they showcase never go out of style. The quick color technique is a quick way to quickly color in a line image.

I will begin by explaining how I colored the Bears. This technique is a great way to quickly color in an image when you will need to color multiple copies of the piece.
First I made my stencil.
I begin by stamping the bear on Glossy Card stock in Archival Black Ink. I like to use glossy card stock because it holds up better for multiple uses and archival black ink because once it is dry it won't smear onto the colored image.
1) Leaving plenty of space between each image - I stamped the bear three times - Once for each color that I wanted to apply.
2) Using an exacto knife, I cut away the area for a single color from each bear. On the sample I wanted to color the bear's pants one color, his shirt another color, and his fur a third color - so I cut accordingly (see sample.) - Cutting out the stencil takes time, but I only have to do it once as I store the stencil with the stamp set and use it again and again.

Coloring the Image
3) Next I stamped the bear on white card stock in a dark brown ink. This is the image I wanted to color.
2) I placed my stencil over the image lining up the part I wanted to color - you can tape the stencil into place using removable tape if you like. I applied Vineyard Berry Ink to the image using a sponge. If you want a uniform coverage use a blotting or pouncing motion - if you want the effect of stronger shading on one side, use more of a rubbing motion on that side of the stencil.
3) Move the template to line up with the next section to be colored - I inked the shirt in Indian Corn blue ink.
4) Continue to move the stencil and sponge on the ink until all the sections are colored - I completed the coloring by inking the bear's fur in Desert Sand ink.
You can do detail coloring with markers if you desire.
Check back tomorrow (10 AM Central Time) to see how to use this technique with solid images.
If you try this, please post a comment to this post and share the link to your artwork. I'd love to see what you make using this technique!
All supplies by Close To My Heart
Stamps: Go Fly Kites (retired), Autumn Bear (retired)
If you would like to learn how to cut the window rings in the card, drop me a comment on this post... if there is enough interrest I will feature it in a future post.
I promised to share some oldies but goodies so here is the first classic technique. These stamps are long since retired but the techniques they showcase never go out of style. The quick color technique is a quick way to quickly color in a line image.
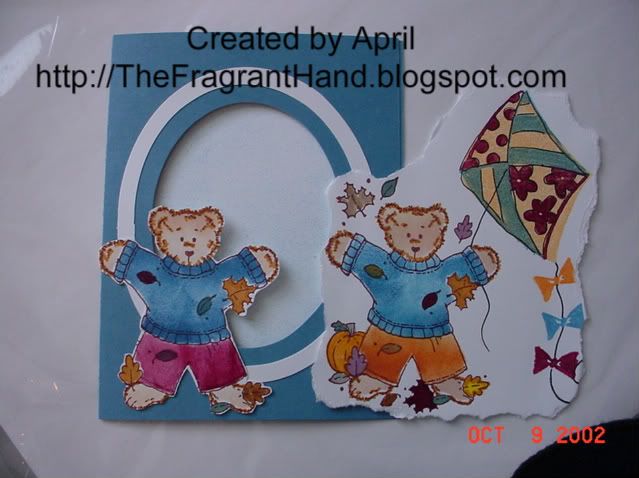
I will begin by explaining how I colored the Bears. This technique is a great way to quickly color in an image when you will need to color multiple copies of the piece.
First I made my stencil.
I begin by stamping the bear on Glossy Card stock in Archival Black Ink. I like to use glossy card stock because it holds up better for multiple uses and archival black ink because once it is dry it won't smear onto the colored image.
1) Leaving plenty of space between each image - I stamped the bear three times - Once for each color that I wanted to apply.
2) Using an exacto knife, I cut away the area for a single color from each bear. On the sample I wanted to color the bear's pants one color, his shirt another color, and his fur a third color - so I cut accordingly (see sample.) - Cutting out the stencil takes time, but I only have to do it once as I store the stencil with the stamp set and use it again and again.
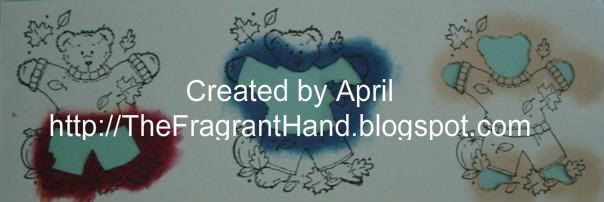
Coloring the Image
3) Next I stamped the bear on white card stock in a dark brown ink. This is the image I wanted to color.
2) I placed my stencil over the image lining up the part I wanted to color - you can tape the stencil into place using removable tape if you like. I applied Vineyard Berry Ink to the image using a sponge. If you want a uniform coverage use a blotting or pouncing motion - if you want the effect of stronger shading on one side, use more of a rubbing motion on that side of the stencil.
3) Move the template to line up with the next section to be colored - I inked the shirt in Indian Corn blue ink.
4) Continue to move the stencil and sponge on the ink until all the sections are colored - I completed the coloring by inking the bear's fur in Desert Sand ink.
You can do detail coloring with markers if you desire.
Check back tomorrow (10 AM Central Time) to see how to use this technique with solid images.
If you try this, please post a comment to this post and share the link to your artwork. I'd love to see what you make using this technique!
All supplies by Close To My Heart
Stamps: Go Fly Kites (retired), Autumn Bear (retired)
If you would like to learn how to cut the window rings in the card, drop me a comment on this post... if there is enough interrest I will feature it in a future post.
Friday, November 14, 2008
Down Memory Lane
Sorry I haven't posed much in awhile. I've been so busy. I went to Regional Celebration with Close To My Heart in San Antonio. Then I've been getting my house ready because I had a Pampered Chef Party, and because my Daddy's coming to visit for Thanksgiving. But I don't want to leave y'all in a big blog blank so I'll be sharing some oldies but goodies.
Monday, November 10, 2008
I was featured on TipNut
I returned from San Antonio to find that my Pesto Mozzarella Grilled Cheese Panini post was featured this week on TipNut's Recipe Hit List: 14 Grilled Sandwich Recipes. How did I know? It showed up on the statistics report for my site counter. Thanks TipNut for featuring me!
Sunday, November 2, 2008
Happy Halloween!
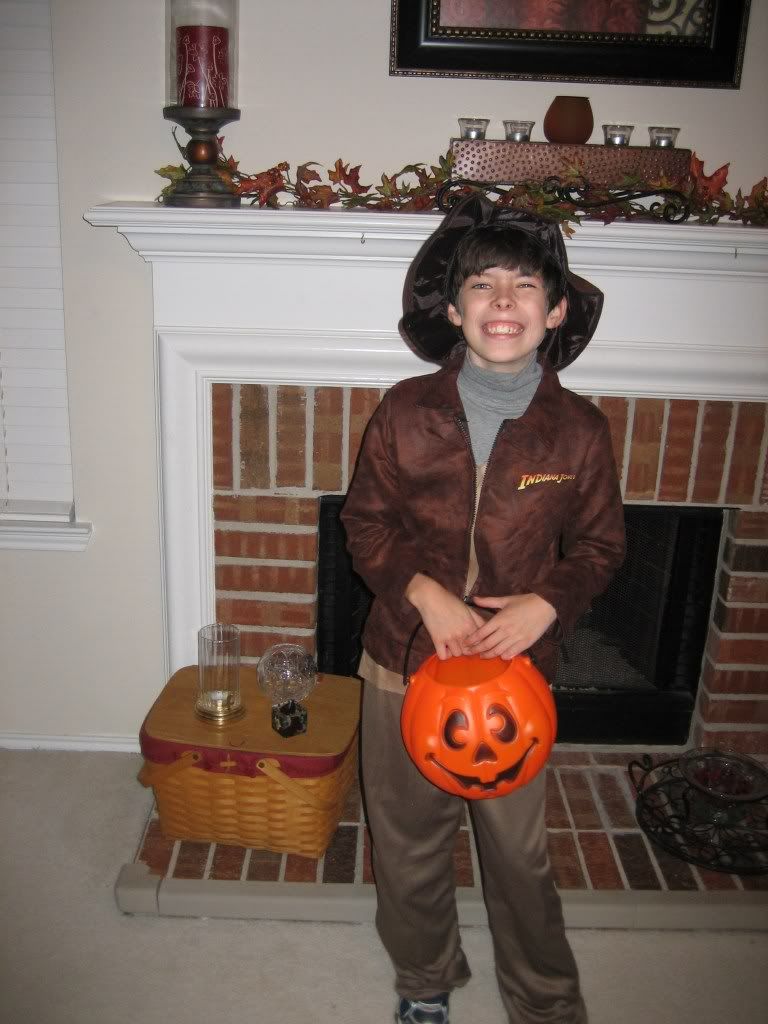
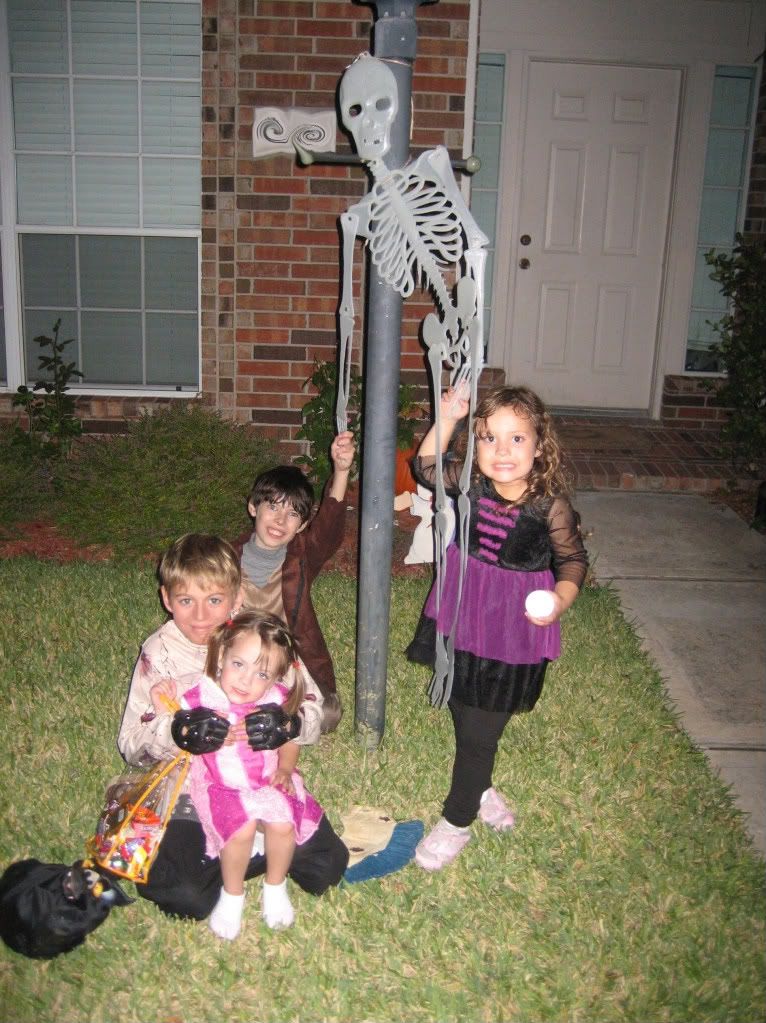
Ethan was Indiana Jones. Every year we go trick-or-treating with our neighbors and a group of their friends. The kids relay look forward to going as a group every year.
Well, I've tried 3 times and it will not load the photos right... I guess my Internet is having issues so I'll try to have to try again later for the rest.
You can click the photos for a larger view.


Well, I've tried 3 times and it will not load the photos right... I guess my Internet is having issues so I'll try to have to try again later for the rest.
You can click the photos for a larger view.
Subscribe to:
Posts (Atom)


 Posts
Posts


