
Showing posts with label Technique. Show all posts
Showing posts with label Technique. Show all posts
Sunday, January 10, 2010
Cuttlebug Machine with Spellbinders Dies
I recently gifted a Cuttlebug machine to my friend Heather. I've been wanting to get her one for a long time, so this year I combined her Birthday (July) with Christmas and sent her a machine. She's expecting & there are so many cute dies and embossing folders to use for baby stuff, I wanted her to have it in time to use with any baby cards, scrapbook pages and etc... that she might be making in her brand-new-mommy days. Oh how I wish I was in California to make over her in her waiting days... so instead I sent her a Cuttlebug.
Telling Heater - via some lengthy emails - everything that her Cuttlebug can do has got me excited about mine again... So I decided to have another go at using Spellbinders Nesting & Embossing Dies in my Cuttlebug machine. This morning I happened across a great YouTube video tutorial of how to do it. It involves layering the cutting & embossing plates in a special order, so I needed a refresher.

Tuesday, December 22, 2009
Spinach Hater's Creamed Spinach
My recipe card calls this recipe Gulliver's Spinach Souffle, but this is not a souffle, it's creamed spinach. Gulliver's is a Prime Rib House in Orange County right across from the John Wayne Airport. I have very fond memories from there concerning prime rib, creamed spinach & Yorkshire pudding... I don't know if this really is their recipe or someone just put their name on it to insure we would all try the recipe. BUT this spinach is really good. My child loves spinach because this was his introduction. I've served this recipe to spinach haters & THEY love it. The only people who don't enjoy this recipe is vegetarians and boy do they WISH they could eat it because it has a heavenly aroma. The key to this amazing goodness is BACON! This is another recipe from my mother, Cathy Black - a veritable treasure trove of exemplary quality recipes!
So you can get a respectable pre-made creamed spinach at H.E.B. over next to the rotisserie chickens... but my Ethan - a 3rd generation bacon aficionado, specially requested MY homemade creamed spinach... I admit I'm a little bit glad mine is better than H.E.B. If you want to teach a child to love spinach... this is the way. We are such fanatics I usually make a double batch. I have also used this as a filling for homemade crepes. Mmmmmmmm.

Spinach-Hater's Creamed Spinach
1 lb frozen, chopped spinach, defrosted
1 1/2 cups warm milk
1/2 cup fine chopped bacon
1/2 cup chopped onions
1 garlic clove chopped fine (more is better)
1 tsp salt
1/4 tsp course ground pepper
1/4 cup all purpose flour (original recipe was 1/2 cup but that's too pasty)
(my addition) a sprinkling of freshly grated nutmeg
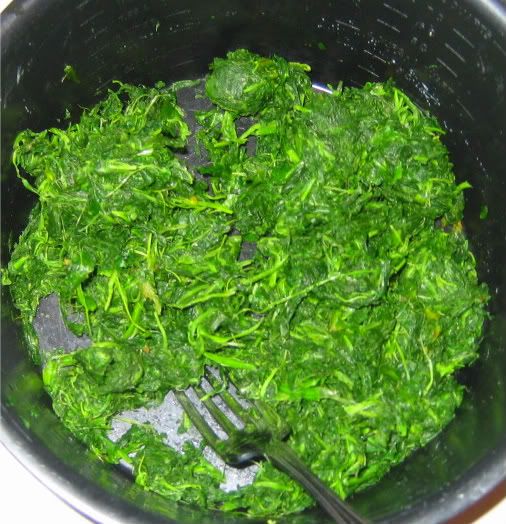
Squeeze spinach as dry as possible and reserve. Squeezing out in a thin kitchen towel makes this an easier task... but it will most likely stain your towel green, so don't use your favorite fancy decorative towel.


You want these bacon pieces small, you can cut them small from the get-go or chop it fine after it's crisp, I think that's easier... but you want the bacon fat for this dish, so make sure to cook your bacon in the large saucepan you'll use for the spinach. The recipe sayscook the bacon slowly, do not brown HOGWASH! If you don't get this bacon crisp it will get flabby when you add it back into the spinach at the end. Crisp away! Remove bacon from pan, reserve.
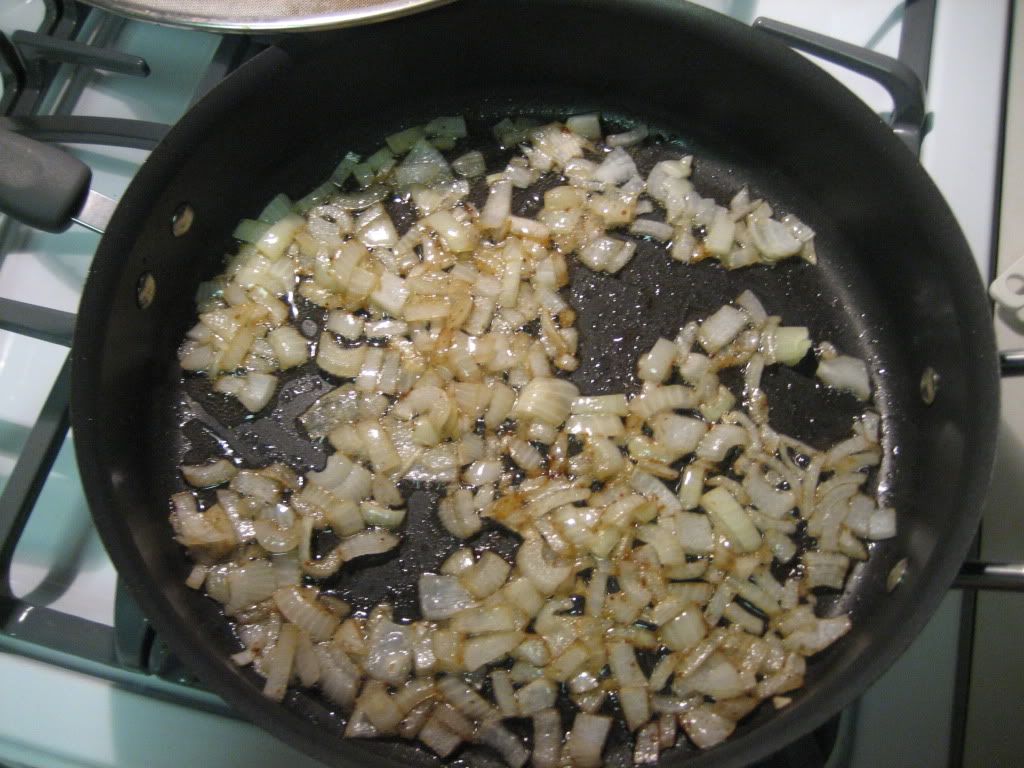
Add chopped onions, cook until translucent. Add garlic, salt, pepper, and flour. Adding the flour will make a paste, traditionally called a roux. Stir continuously for about two minutes. Stir in the reserved, finely chopped, cooked bacon.

Add milk & whip (or stir continuously) until smooth. Stir and cook for two more minutes. Add spinach, use the spoon to keep breaking it apart until it's evenly mixed. Cook for 5 more minutes with the spinach, stirring occasionally. Add a sprinkle of nutmeg if desired. Serve, or refrigerate and reheat on the stove top, stirring often. This recipe can be made a day ahead and will keep for a few days. If it gets too thick you can stir in a little milk as you reheat.
Note about roux:
Learning how to make a roux is one of the most useful techniques I have EVER learned in cooking. You can use this info to make gravy, white sauce (also known as Béchamel), Mornay sauce, macaroni & cheese, a manner of Alfredo, curry and an unlimited number of variously flavored, thickened sauces of your own creation.
A roux is made from mixing together equal amounts of fat (usually butter) and flour. Melt the fat, add the flour and cook for several minutes, mashing around in the pan with a wooden spoon. The purpose of this is to thoroughly combine the fat and flour and cook off the raw flour taste. Once that is done you add liquid according to what you want to make(chicken broth, milk, cream, wine, coffee - whatever is called for) and flavorings (anything from tarragon, to cheese, lemon juice, parsley not all in one recipe of course, but you get the idea.) It's a great thing to know how to do it's probably the single most valuable technique I know for breaking out of recipe box bondage.
So you can get a respectable pre-made creamed spinach at H.E.B. over next to the rotisserie chickens... but my Ethan - a 3rd generation bacon aficionado, specially requested MY homemade creamed spinach... I admit I'm a little bit glad mine is better than H.E.B. If you want to teach a child to love spinach... this is the way. We are such fanatics I usually make a double batch. I have also used this as a filling for homemade crepes. Mmmmmmmm.
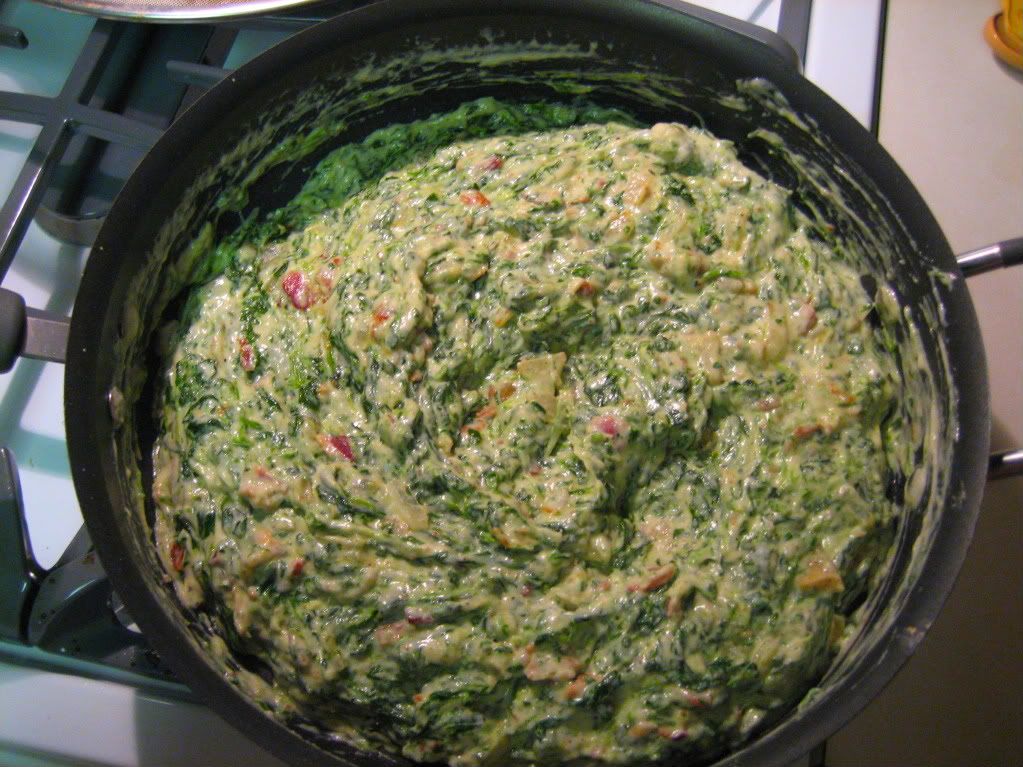
Spinach-Hater's Creamed Spinach
1 lb frozen, chopped spinach, defrosted
1 1/2 cups warm milk
1/2 cup fine chopped bacon
1/2 cup chopped onions
1 garlic clove chopped fine (more is better)
1 tsp salt
1/4 tsp course ground pepper
1/4 cup all purpose flour (original recipe was 1/2 cup but that's too pasty)
(my addition) a sprinkling of freshly grated nutmeg
Squeeze spinach as dry as possible and reserve. Squeezing out in a thin kitchen towel makes this an easier task... but it will most likely stain your towel green, so don't use your favorite fancy decorative towel.
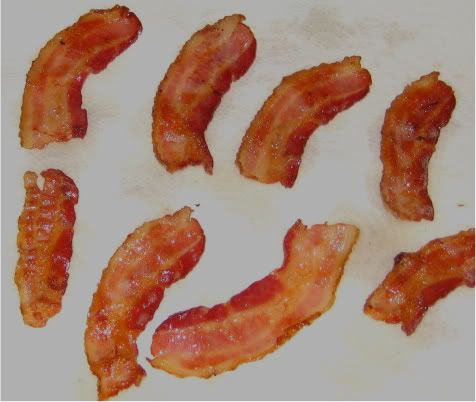
You want these bacon pieces small, you can cut them small from the get-go or chop it fine after it's crisp, I think that's easier... but you want the bacon fat for this dish, so make sure to cook your bacon in the large saucepan you'll use for the spinach. The recipe says
Add chopped onions, cook until translucent. Add garlic, salt, pepper, and flour. Adding the flour will make a paste, traditionally called a roux. Stir continuously for about two minutes. Stir in the reserved, finely chopped, cooked bacon.
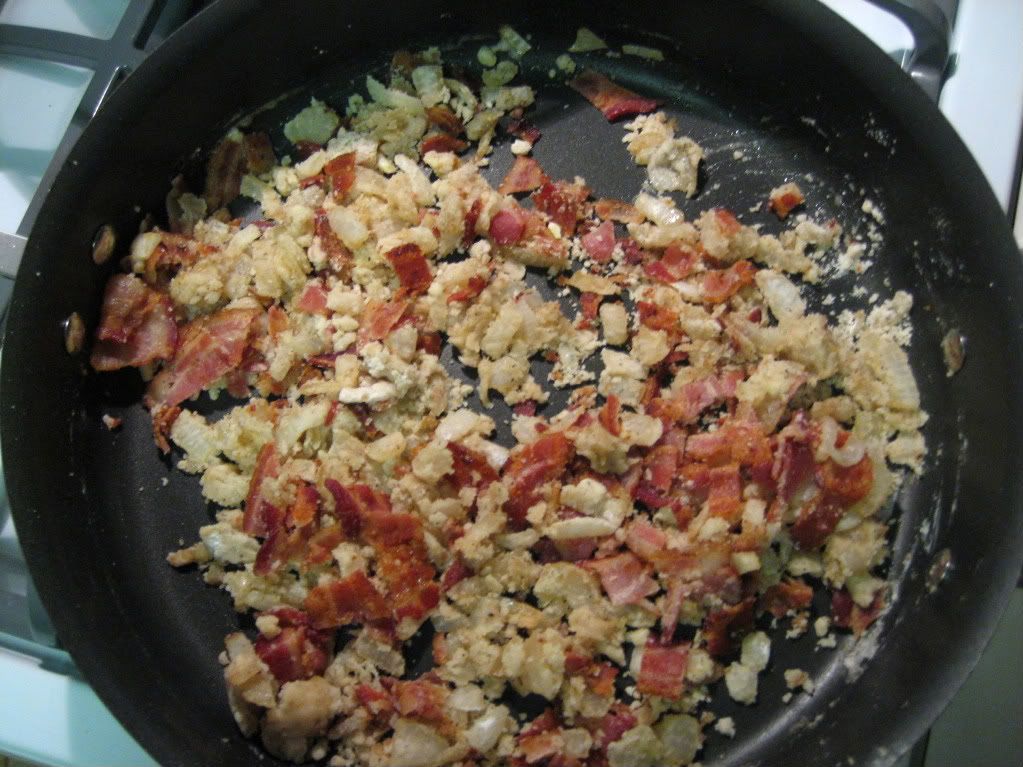
Add milk & whip (or stir continuously) until smooth. Stir and cook for two more minutes. Add spinach, use the spoon to keep breaking it apart until it's evenly mixed. Cook for 5 more minutes with the spinach, stirring occasionally. Add a sprinkle of nutmeg if desired. Serve, or refrigerate and reheat on the stove top, stirring often. This recipe can be made a day ahead and will keep for a few days. If it gets too thick you can stir in a little milk as you reheat.
Note about roux:
Learning how to make a roux is one of the most useful techniques I have EVER learned in cooking. You can use this info to make gravy, white sauce (also known as Béchamel), Mornay sauce, macaroni & cheese, a manner of Alfredo, curry and an unlimited number of variously flavored, thickened sauces of your own creation.
A roux is made from mixing together equal amounts of fat (usually butter) and flour. Melt the fat, add the flour and cook for several minutes, mashing around in the pan with a wooden spoon. The purpose of this is to thoroughly combine the fat and flour and cook off the raw flour taste. Once that is done you add liquid according to what you want to make(chicken broth, milk, cream, wine, coffee - whatever is called for) and flavorings (anything from tarragon, to cheese, lemon juice, parsley not all in one recipe of course, but you get the idea.) It's a great thing to know how to do it's probably the single most valuable technique I know for breaking out of recipe box bondage.
Tuesday, December 15, 2009
Cricut Cookies
 Leave it to a scrapbooker to figure out how to use papercraft tech on Christmas cookies! I'm going to have to try this with my Cricut and my Nana's prize sugar cookie recipe!
Brilliant idea Erin!
Head on over to Erin's Blog Procrastination Station to see how she did it. http://erinlincoln.blogspot.com/2009/12/sugar-cookie-how-to.html
P.S. This is my first time blogging from the car rider line at school. I love my new DROID phone <3 (of course now that I am home I had to add a picture to really let you know what you're missing over at Procrastination Station.) And thanks to Julie Johnson over at Just Our Story for the heads up!
Thursday, November 20, 2008
Solid Pumpkin Stamp - Resizing Tip
Welcome to day four of this weeks Classic Artwork Blitz!
What if you want more different sized pumpkins than what comes in your stamp set. Here is a quick and easy way to get more sizes from your set.
Stamp the pumpkin and cut it out. Trim down the sides to make a skinnier pumpkin, trim the bottom if you want a shorter pumpkin.

The light pumpkins are what I cut out. The darker orange behind shows the original size of the pumpkin before I trimmed it. I used the retired set Frightening Fun but this technique would work just as well with the new CTMH stamp set Spooky Smiles.
Check back tomorrow (10 AM Central Time) for for present tie-on ideas.
If you try this, please post a comment to this post and share the link to your artwork. I'd love to see what you make using this technique!
All supplies by Close To My Heart
What if you want more different sized pumpkins than what comes in your stamp set. Here is a quick and easy way to get more sizes from your set.
Stamp the pumpkin and cut it out. Trim down the sides to make a skinnier pumpkin, trim the bottom if you want a shorter pumpkin.
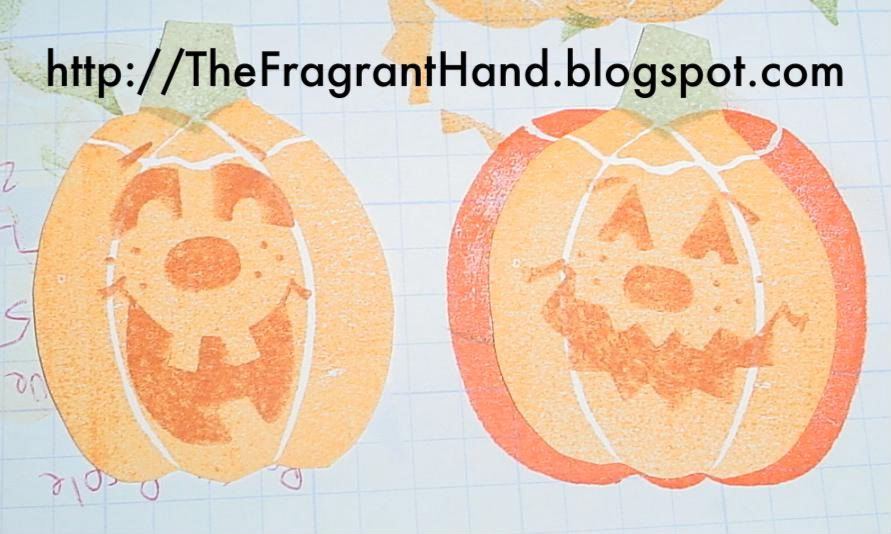
The light pumpkins are what I cut out. The darker orange behind shows the original size of the pumpkin before I trimmed it. I used the retired set Frightening Fun but this technique would work just as well with the new CTMH stamp set Spooky Smiles.
Check back tomorrow (10 AM Central Time) for for present tie-on ideas.
If you try this, please post a comment to this post and share the link to your artwork. I'd love to see what you make using this technique!
All supplies by Close To My Heart
Wednesday, November 19, 2008
Frightening Fun - Quick Color Technique
As part of this weeks Classics Artwork Blitz, here are more Classic samples using the Quick Color Technique described in Monday's Post The Fragrant Hand: Quick Color Technique - Line Image and Tuesday's Post The Fragrant Hand: Quick Color Technique - Solid Image.

I added additional shading to the pumpkins with the quick color sponging technique by cutting out the segments of the pumpkins.
These samples are made with Frightening Fun (retired) but would work wonderfully for adding dimension to the new CTMH stamp set Spooky Smiles just cut segments into your stencil and sponge in a deeper shade or gold or orange.
Check back tomorrow (10 AM Central Time) for a quick tip for use with any solid pumpkin stamp set.
If you try this, please post a comment to this post and share the link to your artwork. I'd love to see what you make using this technique!
All supplies by Close To My Heart
Stamps: Frightening Fun, Curly Greetings
Color Used: Sunflower, Autumn Terracotta, Olive
Ticket Template (retired)
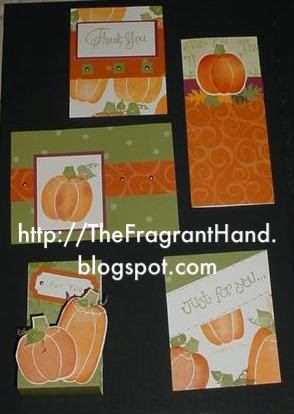
I added additional shading to the pumpkins with the quick color sponging technique by cutting out the segments of the pumpkins.
These samples are made with Frightening Fun (retired) but would work wonderfully for adding dimension to the new CTMH stamp set Spooky Smiles just cut segments into your stencil and sponge in a deeper shade or gold or orange.
Check back tomorrow (10 AM Central Time) for a quick tip for use with any solid pumpkin stamp set.
If you try this, please post a comment to this post and share the link to your artwork. I'd love to see what you make using this technique!
All supplies by Close To My Heart
Stamps: Frightening Fun, Curly Greetings
Color Used: Sunflower, Autumn Terracotta, Olive
Ticket Template (retired)
Tuesday, November 18, 2008
Quick Color Technique - Solid Image
Welcome to day two of this weeks Classic Artwork Blitz!
Yesterday I showed you how to use the quick color technique with a line image. The Fragrant Hand: Quick Color Technique - Line Image Today I will show you how to use it to shade and color solid images. You can color an entire image or you can add colors to an image stamped in a single shade.
First I made my stencil.
I knew that I wanted to apply 3 colors so I made 3 stencils by stamping 3 boats spaced well apart on Glossy Card stock in Archival Black Ink. I like to use glossy card stock because it holds up better for multiple uses and archival black ink because once it is dry it won't smear onto the colored image. I cut away the area for a single color from each boat, using an exacto knife.

Cutting out the stencil takes time, but I only have to do it once as I store the stencil with the stamp set and use it again and again.
Coloring the Image
I stamped my boat image in desert sand ink because I wanted to add color over the desert sand. If you want to use this technique with the entire image - stamp with a light color like buttercup that will be easy to cover, but dark enough to see to position the stencil.
I placed my stencil over the image lining up the part I wanted to color - you can tape the stencil into place using removable tape if you like.
Continue to move the stencil and sponge on the ink until all the sections are colored
Here I have shown you the progression of images from left to right...
1) Solid stamped image in Desert Sand
2) added red and blue to sails
3) added brown to hull.

4) The final boat is colored in red and brown only, this image shows darker shading on the front edge of the brown sail and at the bow and stern. This look is achieved by rubbing the ink strongly into the edge of the stencil where you want the color to be more concentrated.
Check back tomorrow (10 AM Central Time) to see more samples using this technique.
If you try this, please post a comment to this post and share the link to your artwork. I'd love to see what you make using this technique!
All supplies by Close To My Heart
Stamp Set: Light the Way (retired)
Yesterday I showed you how to use the quick color technique with a line image. The Fragrant Hand: Quick Color Technique - Line Image Today I will show you how to use it to shade and color solid images. You can color an entire image or you can add colors to an image stamped in a single shade.
First I made my stencil.
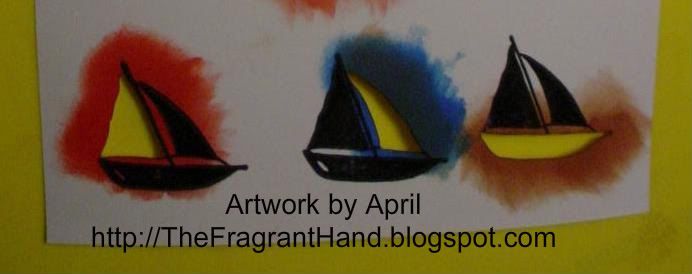
I knew that I wanted to apply 3 colors so I made 3 stencils by stamping 3 boats spaced well apart on Glossy Card stock in Archival Black Ink. I like to use glossy card stock because it holds up better for multiple uses and archival black ink because once it is dry it won't smear onto the colored image. I cut away the area for a single color from each boat, using an exacto knife.
Cutting out the stencil takes time, but I only have to do it once as I store the stencil with the stamp set and use it again and again.
Coloring the Image
I stamped my boat image in desert sand ink because I wanted to add color over the desert sand. If you want to use this technique with the entire image - stamp with a light color like buttercup that will be easy to cover, but dark enough to see to position the stencil.
I placed my stencil over the image lining up the part I wanted to color - you can tape the stencil into place using removable tape if you like.
Continue to move the stencil and sponge on the ink until all the sections are colored
Here I have shown you the progression of images from left to right...
1) Solid stamped image in Desert Sand
2) added red and blue to sails
3) added brown to hull.

4) The final boat is colored in red and brown only, this image shows darker shading on the front edge of the brown sail and at the bow and stern. This look is achieved by rubbing the ink strongly into the edge of the stencil where you want the color to be more concentrated.
Check back tomorrow (10 AM Central Time) to see more samples using this technique.
If you try this, please post a comment to this post and share the link to your artwork. I'd love to see what you make using this technique!
All supplies by Close To My Heart
Stamp Set: Light the Way (retired)
Monday, November 17, 2008
Quick Color Technique - Line Image
Welcome to day one of this weeks Classic Artwork Blitz!
I promised to share some oldies but goodies so here is the first classic technique. These stamps are long since retired but the techniques they showcase never go out of style. The quick color technique is a quick way to quickly color in a line image.

I will begin by explaining how I colored the Bears. This technique is a great way to quickly color in an image when you will need to color multiple copies of the piece.
First I made my stencil.
I begin by stamping the bear on Glossy Card stock in Archival Black Ink. I like to use glossy card stock because it holds up better for multiple uses and archival black ink because once it is dry it won't smear onto the colored image.
1) Leaving plenty of space between each image - I stamped the bear three times - Once for each color that I wanted to apply.
2) Using an exacto knife, I cut away the area for a single color from each bear. On the sample I wanted to color the bear's pants one color, his shirt another color, and his fur a third color - so I cut accordingly (see sample.) - Cutting out the stencil takes time, but I only have to do it once as I store the stencil with the stamp set and use it again and again.

Coloring the Image
3) Next I stamped the bear on white card stock in a dark brown ink. This is the image I wanted to color.
2) I placed my stencil over the image lining up the part I wanted to color - you can tape the stencil into place using removable tape if you like. I applied Vineyard Berry Ink to the image using a sponge. If you want a uniform coverage use a blotting or pouncing motion - if you want the effect of stronger shading on one side, use more of a rubbing motion on that side of the stencil.
3) Move the template to line up with the next section to be colored - I inked the shirt in Indian Corn blue ink.
4) Continue to move the stencil and sponge on the ink until all the sections are colored - I completed the coloring by inking the bear's fur in Desert Sand ink.
You can do detail coloring with markers if you desire.
Check back tomorrow (10 AM Central Time) to see how to use this technique with solid images.
If you try this, please post a comment to this post and share the link to your artwork. I'd love to see what you make using this technique!
All supplies by Close To My Heart
Stamps: Go Fly Kites (retired), Autumn Bear (retired)
If you would like to learn how to cut the window rings in the card, drop me a comment on this post... if there is enough interrest I will feature it in a future post.
I promised to share some oldies but goodies so here is the first classic technique. These stamps are long since retired but the techniques they showcase never go out of style. The quick color technique is a quick way to quickly color in a line image.
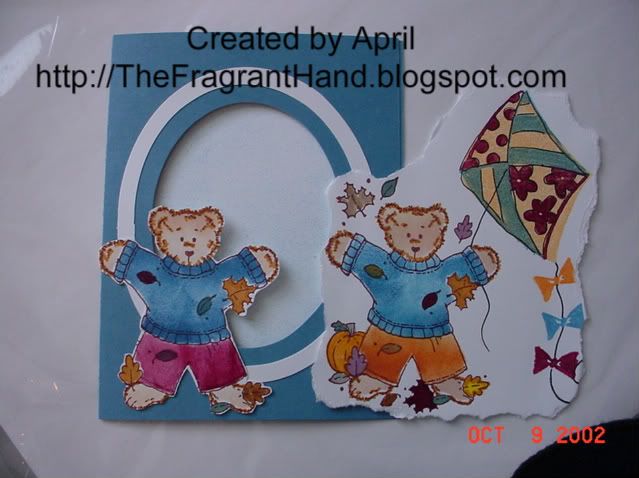
I will begin by explaining how I colored the Bears. This technique is a great way to quickly color in an image when you will need to color multiple copies of the piece.
First I made my stencil.
I begin by stamping the bear on Glossy Card stock in Archival Black Ink. I like to use glossy card stock because it holds up better for multiple uses and archival black ink because once it is dry it won't smear onto the colored image.
1) Leaving plenty of space between each image - I stamped the bear three times - Once for each color that I wanted to apply.
2) Using an exacto knife, I cut away the area for a single color from each bear. On the sample I wanted to color the bear's pants one color, his shirt another color, and his fur a third color - so I cut accordingly (see sample.) - Cutting out the stencil takes time, but I only have to do it once as I store the stencil with the stamp set and use it again and again.
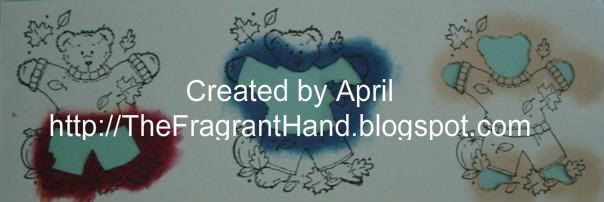
Coloring the Image
3) Next I stamped the bear on white card stock in a dark brown ink. This is the image I wanted to color.
2) I placed my stencil over the image lining up the part I wanted to color - you can tape the stencil into place using removable tape if you like. I applied Vineyard Berry Ink to the image using a sponge. If you want a uniform coverage use a blotting or pouncing motion - if you want the effect of stronger shading on one side, use more of a rubbing motion on that side of the stencil.
3) Move the template to line up with the next section to be colored - I inked the shirt in Indian Corn blue ink.
4) Continue to move the stencil and sponge on the ink until all the sections are colored - I completed the coloring by inking the bear's fur in Desert Sand ink.
You can do detail coloring with markers if you desire.
Check back tomorrow (10 AM Central Time) to see how to use this technique with solid images.
If you try this, please post a comment to this post and share the link to your artwork. I'd love to see what you make using this technique!
All supplies by Close To My Heart
Stamps: Go Fly Kites (retired), Autumn Bear (retired)
If you would like to learn how to cut the window rings in the card, drop me a comment on this post... if there is enough interrest I will feature it in a future post.
Subscribe to:
Posts (Atom)


 Posts
Posts


